Tuesday 23 December 2014

More Handmade Christmas Cards for this Holiday!!!

Once you owned a Sizzix Big Shot, you will never want to stop... It's really amazing to see how shapes are being cut out instantly... Hahaha... So amazed and excited over it... So making one card is never enough especially when cardmaking dies comes with such conveniences...

To upkeep this excitement for this Holiday, I'm sharing two more handmade cards using Sizzix Framelits 'Twas the Night Before Christmas paper collection over at Graphic 45's blogpost today... Missing snow from the USA, I wish I could experience snow here in Singapore... It's the monson period now so it's rain most of the time, so I'm bringing snow to these cards!!!

Christmas is just in 2 days time... I hereby wish everyone a Happy Christmas and a Merry New Year!!!


Sunday 21 December 2014

Weekend Christmas Tags Tutorial with Graphic 45

Hello scrapping folks!!! It's weekend and in just a few more days it's Christmas!!! Yeah!!! Super excited but yet this December is way too crazy... Crazily whooping up more Christmas and CHA projects...

As you could notice I've changed the background on my blog and remove the Christmas playlist, realizing it's slowing down my blog and it's getting quite irritating to browse through the blog with a playlist running... Pardon me for being a bother for this... Hahaha I myself do find it bothersome and decided to just have snow instead to keep the Christmas spirit intact...

Alright, on today's Graphic 45 blogpost, I'm sharing this start-to-finish video process in how to create these mixed media Christmas tags... Surely enough to keep you guys occupied this weekend...


Thursday 18 December 2014

Christmassy Snow Clear Cards

Yeah I know... It's just next week, Christmas is just next Thursday... And for this crazy December, whooping up more Christmas projects and I realized I've made quite a number of cards for this season...

Today over at Clear Scraps' blogpost, I'm sharing these wintery Christmassy snowy clear cards using the Send it Clear cards and Prima's Epiphany paper collection and diecuts from the purple dies series... Love snow and the feel of winter so I've been playing with giltter this whole week!!! Can't get enough of it and my room is kinda gilttery from building the snowman to making the snow fleeces... Added a soft touch of gold to mellow down the general whitish feel of these cards so that whoever receive these cards can feel some warmth in this Christmas!!!


Here is the list of supplies used to make these cards:

Wednesday 17 December 2014

A Snowman's Baggage & Christmas Suitcase

Recalled those cute little matchbox suitcases I've made as part of my Graphic 45 stacked suitcases project? Hmm... So I decided to whoop up something interesting, something cute... 

Over the last weekend, my niece deliberately locked up the door from my parents' room with my dad inside... I was wondering why was she doing that?!? Then moments later, she knocked on the door and started singing, "Do you wanna build a snowman??" Hahahahahaha... She was imitating Anna!!! OMG!!! This was super cute of her given the fact that she was taking her grandpa as Elsa... All thanks to her, she really made my day... And I decided to do up a snowman kit for my niece as her birthday gift which is today!!! Again, inspired from Frozen and contributed by my niece... She was super excited when I showed her what I've made for her over FaceTime... Her expression was timeless...

Building up this little snowman kit is seriously not an easy job and it took me quite some time to figure out how to make this kit in a matchbox... Everything was built from scratch using polymer clay, wires and lots of glitter to build this Mr. Frosty... This little snowman stands at ~2" tall when assembled and can be readily kept inside the matchbox baggage when dismantled... Along with this snowman kit, I've done up another matchbox suitcase with a Christmas tree inside, ready to be gifted away...

I hope besides doing up cards, this can be a fun way to gift for this Christmas... Especially for kids, they will be delighted...

Cheers!!!


Thursday 11 December 2014

Time to Celebrate; A Birthday Pop-Up Card

Just a few weeks ago, someone posted a request in one of the local scrapping FB group I'm in, asking for volunteers to make some handmade cards for a Christmas and Birthday celebration for the old folks... The event was scheduled on the 13th December, which is this Saturday and it coincides with one of the grannies' birthday whose age is 98!!! Wow!!! She's having a long blissful life to live till that age... So I decided to volunteer to make a card for this birthday girl...

What really took me by surprise is the requirement of this card; it has to be A4 in size (8.27" x 11.69") when folded... It never occurred to me a card need to be that big to be given... Seriously, I was indeed taken aback... However, I got to know that the reason why the card needs to be that big - it has to be signed and penned down by the staffs and volunteers who organize this party... It must be a huge group I suppose...

Given the fact that I wasn't a true card-maker, making such a big card definitely puts me into challenging mode... For weeks, I couldn't possess the mojo in cardmaking, not to say in doing up such a big card... I sieved through my Graphic 45 Time to Celebrate collection for umpteen times till I finally have an idea what I want to do... I decided to do a pop-up... Completely a "steal" technique from YouTube and notably Martha Stewart's Mother's Day pop-up card, I re-created this card with added dimensions, together with the birthday girl's name on it... With all the excitement still hovering over my newly bought Big Shot plus I've received my dies (Yeah!!!), I attempted to die-cut on acrylic... And it works on the acrylic craft sheet that comes in my Clear Scraps DT package!!! It was a thrill to see patterns popping out when I passed the acrylic sheet through my Big Shot!!! Heehee... Can't help it but I just wanna find things to try on... 

Alright, I digress... So here I'm presenting this card for this 98 year old birthday girl... Hope she will like it... I hope this will give you an idea when it comes to making such a big card... Trust me, pop-up works amazingly well on big cards and I'm glad I made this choice for this card... 

Front of the card... As it's a pop-up, I'd have to add a ribbon to tie it down..
A close-up view on the embellishments...
The card that pops up with a bouquet of flowers...
The name of the birthday girl was added here...
The back of the card...

Here is a list of supplies that I used to make this card:

Tuesday 9 December 2014

Some Little Snowy Fairies Waltzing this Holiday

Alright scrapping peeps, for today on Graphic 45 blog post, I've this cute little ensemble of faires for you, really to waltz away for this Holiday!!!

Totally inspired from the Disney's movie Frozen, I made these snowy fairies out from clothespin pegs... Frozen is probably every child's favourite movie till date, so is my niece... She is a BIG fan of Frozen and she loves these fairies deeply... I've seen a lot of dolly peg projects and they are so adorable, part of it also came from my fellow Graphic 45 teammie, Nichola Battilana... Can't help it and wanted to make something cute!!!

The process in making them is somewhat challenging as I've to use papers for this assignment and it has to be handmade ornaments. I'd have to factor in whether can this project be translated into a tutorial... After giving some deep thoughts about it, I find creating rosettes skirts as one of the easier method... And it SOooo happen that Nutcracker Sweet has this lovely Snowflake Waltz paper that fits into the theme I want!!! As the scene of Elsa stomping her foot on the icy ground and a huge snowflake appeared as she sang "Let It Go" in Frozen came to my mind and that's where I get the inspiration in creating these snowflakes stands for these fairies... The stands are entirely made from those plastic saucers I've for my mixed media projects and classes...

SO here am I, presenting these little cuties to all of you!!! I hope you will enjoy this little performance by them... Snapguide tutorial follow by...

And Happy Holidays!!!


Thursday 4 December 2014

Amending Typo Error in Epiphany Layout

When you get too engrossed in finishing up a layout, sometimes mistakes do happen... As I happily finishing up my Epiphany layout and started sharing, I realized there's a typo in my lettering!!! I missed out a "h" from "Ephiphany"!!! Goodness how could I not check the spelling before adhering the letterings down...


Well, fret not... I decided to amend it... Luckily I glued them down using glossy accent, and managed to pick the last 3 letters up... Surprising glossy accent don't really ahere well on foam which made amending a hassle free one... It's also partly because I did the layout on canvas... If it was done on paper, I won't be able to pick them up as glossy accents stick to paper like no other business; I'd probably tear it... Phew!!! Thank God!!!

So here is the amended layout with the correct lettering...


Monday 1 December 2014

A Prima Epiphany Mixed Media Layout

Alright scrapping peeps, I know some of you've been waiting for this and it's my pleasure to present my first ever start-to-finish mixed media video... Now screening on my YouTube channel.. Yeah!!!

In this pilot video, I'm sharing a time-lapsed progress in how I created this pearlescent Epiphany mixed media layout using Prima's Epiphany paper collection, Ingvild Bolme's Shabby Chic Treasures, Prima flowers, Colour Bloom Sprays and Finabair's ArtBasics, ArtExtravagance and ArtIngredients... Yes it's a layout that I used almost 90% of Prima goodies!!! Though the general look of this layout look simple, but the work behind is not what you think it is as you will get to see in my video... The Epiphany collection contains a good blend of pastel blue, pink and gray which will be the colour palette I worked towards in building this layout... Filming is not really easy for start-to-finish mixed media videos as I'll have to plan properly to ensure the flow is smooth... Certain tasks such as fussy cutting, planning and positioning of embellishments to waiting for medium to dry are not shown in order to make the video within 30 minutes for maximum pleasure and viewability... I was quite excited yet nervous for this as I was pretty concern that it may not turn out that well... Finally I survived!!!

I had developed this photo of mine and had kept it for quite a long time till I decided to create a layout using Prima's Epiphany collection... The white pureness with a touch of soft pastels of this collection just make my heart flutter... I really love this collection... Moreover I'm a Christian and Epiphany has a biblical meaning to it... Epiphany itself is a traditionally observed church fesitval held on 6th January to celebrate the manifestation of the divine nature of Christ as represented by Magi (Matthew 2:1-12)... Hence, I decided to create a layout to kick start this holiday season (though it's not 6th January yet), to commemorate my status as a child of God and the essence of the Gospel and Christ... Also, as a form of remembrance and realizations I've gotten from God...

Alright, before I bored you guys any further, here I'm presenting this for your crafting inspirations... Feel free to let me know what you think and remember to comment and subscribe to my channel... More photos below and a list of supplies as follows...

Happy crafting!!! Cheers!!!


Here is a list of supplies I used for this layout:

Thursday 27 November 2014

Virgin Big Shot Trial on Thanksgiving...

For those who have following me on my Facebook and Instagram, you probably know I finally got myself a Sizzix Big Shot... Yes, after 2 years of procrastination, I managed to get one yesterday and I got it at a pretty good deal with my Spotlight gift voucher... It's a $40 off, so after the deduction I paid $89 (~USD68) for it that comes with an extended multipurpose platform and a set of cutting pads...

My new crafting toy - the Big Shot...

After that, it was the exciting part - playing with my new toy... For someone like me who never use a die-cut machine before, this was seriously a "BIG" event... I know once I own a Big Shot, I'll venture into dies which is one of the reasons why I refused to get one previously because it will burn my pockets deeply... Hmmm, timing was kinda right; Black Friday is just round the corner and alot of sites are having an early start... With all the good deals such as Tim Holtz Texture Fades embossing folders offering as cheap as USD1.26 for a pack of two, and Sizzlits as cheap as USD4 each, who couldn't resist the temptation?!? I AM definitely factoring I don't have a library of collection yet... Indeed, with all the excitement in exploring all other crafting possibilities, I bought a total of 30 dies and embossing folders during this Black Friday sale... Ouch!

Alright, after getting these great deals (even it had burned my pocket), suddenly I had this sense of satisfaction and I feel complete... While I'll need to give the merchants some time for them to ship my orders out, I seriously can't wait... With all the excitement hovering around me, I desperately want to attempt my virgin trial on the Big Shot.. Thankfully, I've a few Thinlits and Framelits in my DT package, thanks to the generosities of Graphic 45 and Sizzix... Woohoo!!! Yes and I excitingly cut my cardstocks, sandwiched them and run through the machine... Then I heard a "thug" sound, at that moment I was like OMG!!! Did I broke my die?!? I quickly passed through the entire cutting pads and extender and was taken aback to find that my die is still intact... So why is there a sound?!? Concerning that it might damage my Big Shot, I contacted one of my scrapping peeps and she told me it's an indication that the die had performed its cut onto the cardstock... I was also told by her that I may develop a liking to the sounds of Big Shot... LOL!!! Is that a kind of creative stimulus??

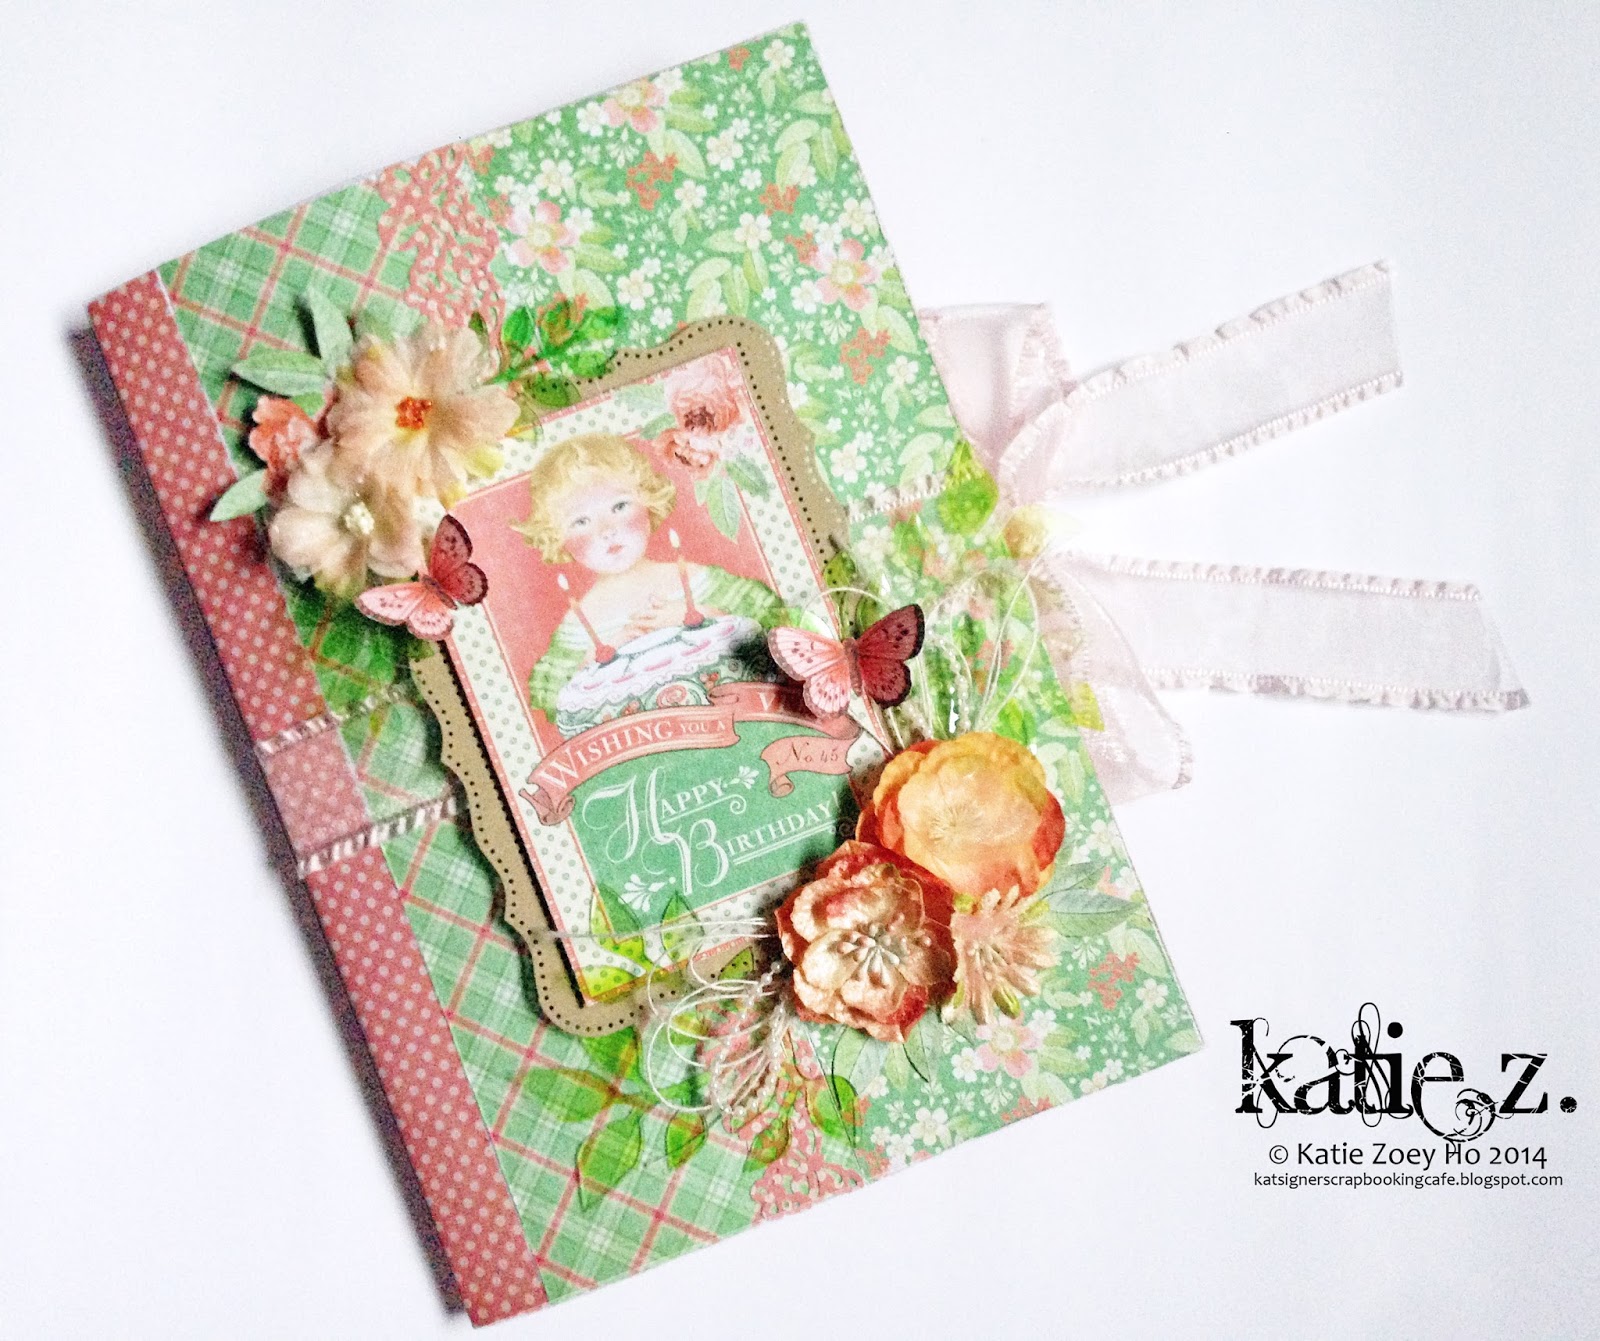
Nonetheless, I finally performed my very virgin trial on my Big Shot!!! I'm a happy camper!!! So now sharing here my virgin Big Shot project using Elegant flip-its card Framelits and Graphic 45 Botanical Tea paper collection... For someone like me who is not really good in making cards, this card Framelits definitely make cardmaking so much easier... It's indeed one such virgin project performed on Thanksgiving...

Hope you guys enjoy what I've shared here...

Cheers!!! And happy crafting!!!


Wednesday 26 November 2014

Upcoming Prima Class at Made with Love

It's coming to end of 2014, time really flies... To welcome 2015 and to offer more fresher inspirations, I've designed this mixed media altered notebook for my next upcoming Prima class at Made with Love... Happening this late December and early January next year...

For this time round, I'm shifting away from project-based lessons to technique-based classes, this is to ensure scrappers who attend my classes will get to learn something... I'd have to bring across to scrappers that this may not be a pure beginner's mixed media class as this involves creating of a vintage background before embellishing... There's intricate fussy cutting involve as well..

Below is the promotional collage and pictures of the project you will be learning and taking home... I hope to see you guys again!!!

Cheers!!!


Thursday 20 November 2014

Shimmerz Design Team


Working on paints and mediums is always on my list and I always love to explore more, to learn more and discover new techniques... It's also one way to train my creativity brain cells and in hope I can extend my skills and teach...


I've heard so much about Shimmerz and finally I'm in their Design Team next year... So exciting and hope I'm able to bring in more inspirations..

Cheers!!!


Wednesday 19 November 2014

My Graphic 45 DT Paper Crafter's Library Spotlight

Today is my turn to be on the Paper Crafter's Library Spotlight as a Graphic 45 DT member.. All thanks to Graphic 45, as their DT member we will at least get a chance to be featured in such amazing crafting blog...

What I'm sharing is this handmade butterfly necklace together with this altered box... Using Graphic 45 retired collection, Secret Garden and Graphic 45 Staples, I created this exquisite gift for one of my close girlfriend who is currently facing some tough times in her marriage and perusal as an actor...

I'm not someone who is really very good in accessories making, and seriously this butterfly pendant is my very first attempt... I've seen several projects using embossed metal pieces and perhaps I should give it a try... So I embossed some floral designs onto the metal butterflies using an embossing gadget I borrow from my friend... I was so afraid it will damaged the embosser, but luckily it didn't and it worked!!!

This little gift may not help or improve her situation, but I hope it will give her some sunshine in her life, brave her heart up and fly like a butterfly...

Hope over to Paper Crafter's Library to view more pictures on this project... There's a prize pack awaiting to be won, so don't forget to do so...

Good luck!!!


Monday 17 November 2014

A Typographic Grunge Altered Bookend for Core'dinations & Graphic 45 Blog Hop


On today's Core'dinations and Graphic 45 Blog Hop entry, I'm sharing this altered bookend which was orignally built by my youngest sister as part of her Design & Technology school project... We managed to find this bookend at a drawer near her desk one day while doing some spring cleaning back in my mum's place...

To give this book end a new lease of life, I decided to alter this bookend as a gift for her... Using some embossed clock images on Photogenic cardstock from the Core'dinations Signature Series as a texture foundation, I white-washed it and added on tons of metal staples and embellishments to achieve this typographic grunge look… Typography certainly has some interesting verses that I find it applicable to serve some wisdom for my sister - a reminder that life is not just about dreaming and hope for the best, but to live, laugh, adopt, encourage and be genuine… Patience is key and hope this sentimental altered piece will serve as a good life reminder...

I've also created a video tour in how I came up with the idea in altering this bookend as well as concept behind... Hope this will give you some ideas in how to alter pieces as such...

Happy altering!!! Cheers!!!