Showing posts with label Martha Stewart. Show all posts

Sunday, 3 March 2019

A Rustic Garden Wedding Guest Book

Oh well, before I get into this... Happy 2019! Though a little late for the New Year greetings (it's March now!), I still feel there's a need to greet everyone who reads my blog. 💝

For the very first project of 2019, it's probably one major project to begin with that took me about a month plus to get this done up. Planning started as early as late December. Sharing here is one special wedding guest book I've done for one of my girlfriends, who got married recently. It's also one project that I decided to use it for Graphic 45 February challenge.  


Wedding guestbook is perhaps one of the basic essentials most couples would want to have during their big day, a book that allows all their friends and families to jot down their heartfelt blessings and messages. While it's easy to get the wedding planner to get one for you, my friend Sarah actually approached me to help her with this. What really touches me is that she entrust this entirely to me, believing I'd be able to deliver the very best for her. That's the best part, but it could also mean stress to me.

Knowing her wedding was going to be of a garden theme and would be held in a colonial house restaurant with a rich history, I thought a dainty wood-grain textured cover with a touch of gold and distressing brown would be more suited. Bearing in mind of the colour scheme Sarah was using for her wedding, Graphic 45 Princess collection is the way to go...


"Once Upon A Time" is title of the guest book within where I modified and re-engineering the pocket albums into a functional book by means of bookbinding. It took me a while to figure out how to integrate the book onto it's cover. After much thinking, I decided to keep the book separate from it's cover.


To make the entire guest book an interesting one, some of the couple's pictures were made detachable using magnets where they can place their photos anywhere they want. This will add some fun to it and not making the guest book a boring one. Rather it'd be very close to heart and personal.


Nearer towards the end, I decided to do up a mini album for the couple. To house them, I made a box from scratch as well. Everything made was made with thoughts of functionality and usability. Inasmuch as I could, I try to make this guest book as durable as it can last.


I used quite a lot of gold to brighten up the entire look mainly on the diecuts, a club kit I bought from Spellbinders that I also use it for Sarah's bridal shower card!


Well, this is the whole package I made for Sarah and Jason for their wedding day, which spans more than just any other guest book. To keep it short and sweet here, I've written a brief description over at Graphic 45 blog in how I made this entire package. Over here I just wanted to share the extend of my work and some thoughts on how I created this project, in hope to provide some inspiration.

Nonetheless, should any of your is interested to know the supplies I'm using for this project, the list is below with links to where to get them for your convenience:


Monday, 10 December 2018

Rustic Nature Wedding Guest Book

On 3rd March this year, I've witnessed the wedding of a lovely couple I know - Ernest and Stephanie. As part of my wedding gift to them, I did a guest book for them. It was also part of Canvas Corp July Wedding Challenge this July. A long overdue project update here. This entry was on draft mode for very long till the birth of their son Theopilus reminded me on this book. Without much talking, here is what I've made for them.


The guest book itself is a vintage ledger book from 7gypsies Architextures which I purchased it for this purpose. I merely did up a mixed media layout for them on the front cover. I used quite a number of die-cuts for this layout, mainly from Tim Holtz steel dies. I tried to match up to the "look" of the photos they provided me and decided upon a rustic, dainty nature look. As always, I love to centralize my design focus as this is one of my most preferred layout.


Loads of floral and swirls, together with touches of twine, burlap, handwritten script and woodgrain effects which I transformed bits of chipboards into. Since the front is already quite dimensional, I kept the back of the book as simple as possible.


Wedding is just only a ceremonial indication of a marriage between a man and a woman, what's really important is the marriage itself. Therefore, I didn't just stop at the front cover, and think it'd be better to have one more layout of this lovely couple right at the very first page of the book which marks as the very new beginning for them after their wedding.


I hope the guest book has been filled up! 

Below is a list of supplies I used for this project with some links included. Unfortunately, not all are available and most 7gypsies and Tattered Angels products can be purchase at Canvas Corp website itself:
  • 7gypsies Architextures 
    • Vintage 12" x 12" Ledger 
    • Mix and Match Bee 8.5″x 11″ Book
    • Mixed Media Pack
  • Tattered Angels 
    • High Impact Paints (Antique Gold & Platinum)
    • Naturally Aged Kit – Rusty Metal (Faux Finish Paint Kit)
    • Color Wash Paint Faux Finish (Verdigris)
    • Glimmer Mist (Key Lime Pie)
  • Sizzix Tim Holtz Dies
  • Ranger Archival Ink in Jet Black (Blitsy, Scrapbook.com)
  • Own stash (burlap, jute twine, mini alpha chipboards, scripted handwriting & bark grain stamps) 

Sunday, 29 July 2018

Floral Shoppe Ephemera Cards

We all have some sort of papercrafting dilemma. And I tend to get that a lot especially I want the best of both worlds with minimal damage, as much as possible. This probably speaks a lot about my way of crafting.

Oh well, long time no see everyone! I'm glad that I'm able to find time to blog this entry - a post that's perhaps way behind my post with Graphic 45 last week. That's one thing I love being in Graphic 45, a lot of work was pre-planned in advance in a way that I don't have to rush in and try to get things done at the nick of time. However, do pardon and be patient with me for the next few weeks while I'm trying to get my timing right. I've been really bad in handling my time for the past weeks due to sudden hiccups in life which I'm still struggling at.


So moving on, making use of the time I have without sharing much about my hiccuping life, I shall go straight to the point on what I've done for Graphic 45 for this July. I'm re-sharing one of my old videos which I've done in 2016 - fussy cutting. It's a cutting technique that I've acquired while I was doing my footwear design course where we were taught to cut footwear patterns out from cardboard using utility/craft knife. I find this method rather ergonomically friendly and easier to control, hence decided to attempt this on designed papers where the intricacies are way complex compared to footwear patterns in general. And it kinda works, giving me more defined cuts than scissors can ever provide. In my video above, I explain very briefly how to hold and use the utility/craft knife to fussy cut as well as some useful tips in getting the right blades. More papercrafting tips over at Graphic 45 blog which you can hop over to read further.


To show how this technique can come into good use, I created two very simple ephemera cards using Graphic 45 Floral Shoppe collection. Such a beauty of this collection! And who doesn't loves flowers? I do of course! Sometimes you just need to break the various design elements and reassemble them to create your very own design. And that's what I did!


Summing all up that's what I got to share today (though it's a week late), and I do hope the video would be able to address some of the questions you probably have in mind. If you've any questions, do always feel free to drop a comment or even send me a message. I'll gladly respond and assist whenever I can. So, below here is a list of supplies in where to get these lovely collection and I shall see you guys very soon again! Happy papercrafting!!!

List of Supplies:

Monday, 19 March 2018

My Canvas Corp 4" x 4" Canvas Art


One of the requirements for being part of Canvas Corp Crew is to do up a 4" x 4" canvas that best represent yourself. It was a rather busy week for me last week, however I manage to get my canvas all done up! Can't wait to share it around and here I am sharing this today! Yeah!!!


It was indeed my very first time doing such a small canvas art. Though I felt I might not have enough to work around with, I managed to come up with a composition that's within the context I'd want to express. Using various Tattered Angel's mixed media products as well as Finnbair's old mechanicals, this is what I came up with. As the canvas itself requires no priming, you can pretty much work straight to it. I die cut out a few florals from some of the papers within 7gypsies Architextures 8.5" x 11" Mix and Match Book using Tim Holtz' Tattered Floral Bigz Die, distressed the edges and layered over the canvas to create some texture before all the misting and painting comes it. 


Those pretty lace I wrapped around the canvas is from 7gypsies which unfortunately it's a retired item. To give it a little rustic and ragged look, I misted some bandages with Tattered Angel Cork glimmer mist to go over the lace, and secured it with some Prima jute straw.


Not wanting to spare the empty space at the back of the canvas, I decided to do up a miniature Art Room within. That cute little frame is from my paperclay try outs using one of my Martha Stewart silicon moulds, which is of a good size to fit within. 


Nonetheless, it was a rather fun process to do up such a small mixed media canvas work. I'm pretty please with the final composition though I was a little concern about the small space given. Below is a list of supplies I used for this project with some links to various sources should anyone of you are interested to get them:
I hope this has been an inspiration in how to work within small canvas spaces. I shall see you all very soon with a tutorial.


Friday, 22 January 2016

Fussy Cutting Technique using Utility Knife


I absolutely love fussy cutting! I have to admit that I can be a real freak in fussy cutting! Undeniably, it can be really therapeutic. Your brain will just shut off and only focus in cutting, as if your entire world is only about you and your scissors. While investing in a good pair of precision scissors is a must for fussy cutters, for some reasons I do like to fussy cut using my utility knife. Mainly due to the intricate, smooth and detail cuts I can achieve which scissors is unable to.

I didn't realize I've been cutting things the wrong way till I was taking my pattern-making modules during my footwear design course, where we've to use utility knife to cut our patterns out from cardboard and scissors are strictly prohibited. This is where I learned the proper way to cut things. If you didn't use the right tool and cut things the wrong way, it's no doubt it could be a potential health hazard. For this weekend, I'm sharing this short tutorial in how to fussy cut using the utility knife. Sit back and enjoy!


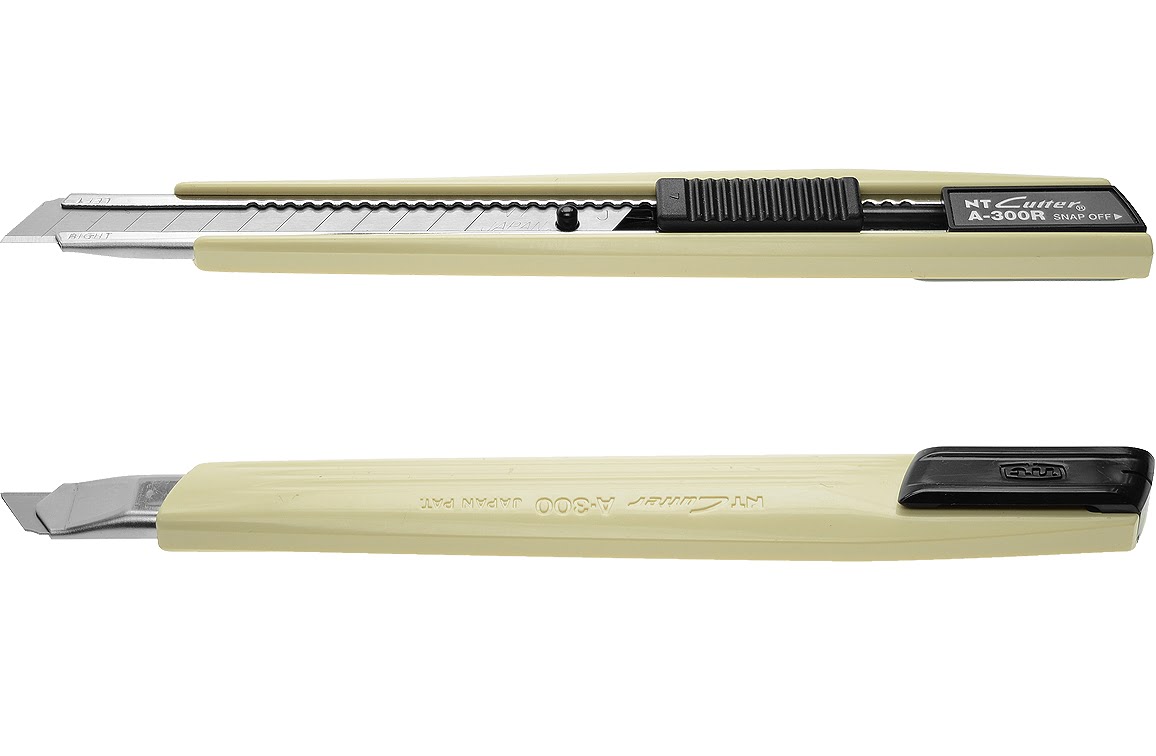
Below here are 2 utility knives I used frequently for all my cuttings:

Martha Stewart Utility Bone Folder
A multi-functional craft tool that allows you to score, trim, emboss and pierce. It comes with a detachable tweezers as well which you can use to pick up stuffs. This tool is also known as the 5-in-1 craft tool. Below is a YouTube review by Jenny of CraftTestDummies.com.


What really attracts me to get this tool is it's versatility, plus the blade itself is extremely sharp. I use this for most of my fussy cuttings which I demonstrated explicitly in my video. While I love to use this tool to fussy cut, unfortunately it doesn't has any auto-lock system in place to hold the blade. There're several occasions where the blade flew off when I exert too much pressure as I cut. SOooo I won't really recommend this tool for cutting chipboard.

I bought this tool at full price and now it seems to me that Martha Stewart is going to discontinue this product, so everywhere is having some sort of clearance at great discounted prices. Great news to those who are interested to get one, but the bad news is the blades don't seems to be available abundantly and they are pretty expensive for a set of 3.   

Amazon.com is selling at $16.99
Martha Stewart Crafts Australia is selling these blades at AUD$6.60

This seems to be really great tool to have, especially when you are travelling. This tool will seriously save you the hassle to pack so many tools into your luggage. I do find the tweezers pretty useless as I don't really use it, mainly 'cos I tend to work on small stuffs and very much prefer a sharp pointed tweezers over this. Other than that, the clean and sleek design does make this a really classy tool to have.

NT Cutter A-300R/RP
Considered one of the best utility knives ever available. Artists preferred cutter, and it's also one of the world's best selling product. The tool has this ABS exterior body which is extremely durable and it's designed to provide a good grip. Comes with Ratchet-lock slider which automatic lock the blade as you push up the blade. Definitely not as pretty as Martha Stewart's.

This utility knife only cost $5.80 at Amazon.com

I got to own this tool from my father about 15 years ago and that's exactly the one I featured in my video. This really shows how durable this tool is and it has yet to fail me. Once you own a good tool, you will very much prefer to use it for as long as you can survive. There's a reason why this NT-Cutter is consider one of the best selling product. Though I didn't really demonstrate how to fussy cut using this tool, the same technique still applies. 


The precision blades are available at pack of 50-100 pieces at Amazon.com. These snap off blades are made of high quality carbon steel which is definitely of a much better quality compared to Martha Stewart's blades. Despite of it's standard duty, I used these blades in most of my chipboard cuttings without much problems though it tends to get blunt easily. 

I'd have to say in the long run, investment in this tool plus the blades certainly has a much better economic value compared to the Martha Stewart's. In terms of the price and durability, you are certainly paying for quality and functionality. Unlike for Martha Stewart, you are actually paying mainly for the brand and design itself, not exactly the functionality. 

Though I do like Martha Stewart products (mainly due to her sleek and clean designs), sometimes I do really find them rather expensive. She does produce some good quality products, however for someone like me who cuts stuffs a lot, it's always better to get a utility knife that's solely designed for cutting.

I hope this has been helpful. If you've any questions, feel free to ask by leaving a comment below. 

Happy crafting and  Good Day ahead!!!


Wednesday, 29 April 2015

Safari Trunk Boutique Diorama

Besides being a coffee freak, I'm equally a freak in imagining doing certain things in unusual places such as shopping for my favourite trunk in a Safari park. Presenting here my ideal Safari Trunk Boutique diorama which is on this week's Alpha Stamps newsletter project highlight using this month kit.

Used a bazillion of Alpha Stamps' supplies plus those greens and other supplies I've been keeping for God knows what the hell I'm hoarding for, I transformed a small wooden box into a wooden chest using Tim Holtz wood grain stencil and painted it over with various shades of brown. Added a layer of bushes and dumped some branches and fern garlands at the top. To finish off, I added on claw feet and lion head door knocker. Oooo how cool is that!!! I love these new Graphic 45 staples!!! They simply match this theme so well. Don't you feel Safa-rish-ing? 


There's 2 level in this boutique, level 1 is for men; all sort of explorer stuffs while level 2 is for women!! Fashion parade in front of the mirror and have a comfortable rest on a nice chair, ladies are only interested for bags isn't it? What's more to this diorama is I can hold it with one hand. Feels like I'm owning this whole Safari Trunk Boutique all by myself. Added a 3D giraffe nibbling the leaves off the branches, as well as some little pocket watch charm, binoculars and ornate key on the other end of the branch. This just spice up the entire Safari scene. I have a step-by-step tutorial in how to make this 3D giraffe from the collage sheet at the bottom of this entry. A full list of supplies follows by.

Happy trunk shopping. And I hope you have a wonderful day ahead.

The entire view of Safari Trunk Boutique. This diorama is available HERE.


The tree branches and greens at the top.

The main entrance of the Safari Trunk Boutique.


A closer look at the fallen charms.


A shawl, folding newspapers and a passport of a lady traveller.


Explorer stuffs all men will love...


Tutorial in making 3D giraffe from Out of Africa collage sheet


Step 1: Create a mirror image of the giraffe. You can reverse the image within Adobe Acrobat by following the instructions HERE if you've the software... Otherwise you can reverse the image using Microsoft Word by taking a snapshot of the giraffe on Adobe Reader, paste the image onto a word document, copy and make another copy and flip the image horizontally (under Picture Tool > Rotate). 


Step 2: Print and fussy cut the giraffes out. In order to "strengthen" the giraffes, backed the print outs by gluing them over a piece of cardstock before fussy cutting. This can be omitted if you had printed them on a heavy weigh paper. Distress the edges if preferred.


Step 3: Paint or distress the backing cardstock with black paint or black soot distress ink. You will only need to do this if you are using a light colour cardstock as backing or you've printed on a heavy weight paper. Otherwise, backing with a black cardstock will conveniently save this step.


Step 4: Build a 1/4" block by stacking a few medium weigh chipboards. I often keep scraps of my chipboards so that I can use them for functions as such.


Step 5: Paint the edges with some black paint.


Step 6: Glue the block onto one of the giraffe as shown.


Step 7: Sandwich the block by gluing the other giraffe. 
Make sure they are match in symmetry.


Step 8: Glue the heads together as shown.
This will eliminate the illusion of having a double-head creature.


And you are done!!! Here is one proud standing 3D giraffe.

Supplies List: